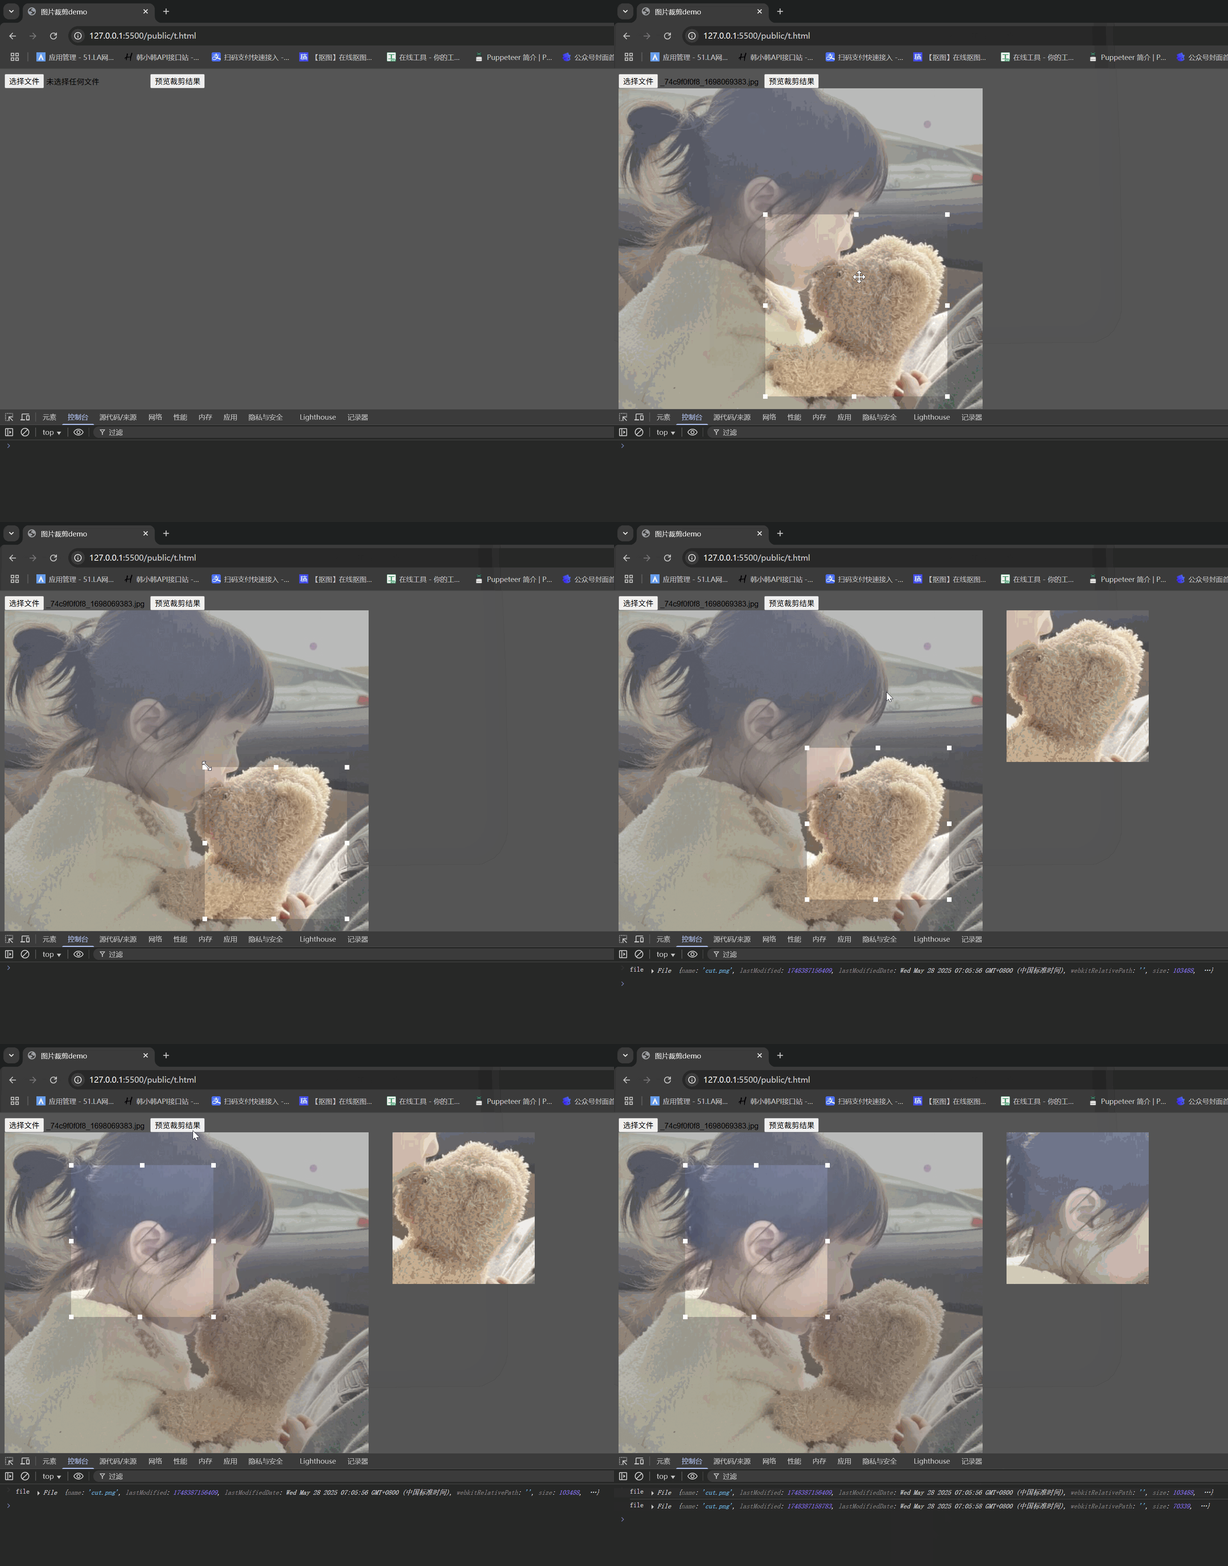
图片裁剪是现代 Web 应用中常见的功能需求,无论是社交媒体平台、电商网站还是个人博客,用户经常需要对上传的图片进行裁剪以获得最佳显示效果。本文将介绍如何使用纯前端技术实现一个功能完整的图片裁剪工具,无需后端支持即可在浏览器中完成图片裁剪操作。
实现原理概述
我们的图片裁剪工具基于 HTML5、CSS3 和原生 JavaScript 实现,主要利用以下技术特性:
- 使用 HTML5 的 File API 处理图片上传
- 通过 CSS 的 clip-path 属性实现图片裁剪效果预览
- 使用 Canvas API 生成最终裁剪结果
- 结合鼠标事件实现裁剪框的拖拽和缩放交互
实现效果展示
完整功能代码
<!DOCTYPE html>
<html lang="en">

<head>
    <meta charset="UTF-8">
    <meta name="viewport" content="width=device-width, initial-scale=1.0">
    <title>图片裁剪demo</title>
    <style type="text/css">
        body {
            background: #555;
        }

        #box {
            position: relative;
        }

        #img1 {
            opacity: 0.6;
            position: absolute;
            top: 0;
            left: 0;
            user-select: none;
        }

        #img2 {
            opacity: 1;
            position: absolute;
            top: 0;
            left: 0;
            user-select: none;
            /* clip: rect(0px,200px,200px,0px); */
            clip-path: polygon(0px 0px,
                    /* 左上角 */
                    200px 0px,
                    /* 右上角 */
                    200px 200px,
                    /* 右下角 */
                    0px 200px
                    /* 左下角 */
                );
        }

        #main {
            position: absolute;
            width: 200px;
            height: 200px;
            cursor: move;
            display: none;
        }

        .minDiv {
            position: absolute;
            width: 8px;
            height: 8px;
            background: #fff;
        }

        .left-up {
            top: -4px;
            left: -4px;
            cursor: nw-resize;
        }

        .up {
            left: 50%;
            margin-left: -4px;
            margin-top: -4px;
            cursor: n-resize;
        }

        .right-up {
            right: -4px;
            top: -4px;
            cursor: ne-resize;
        }

        .right {
            right: -4px;
            top: 50%;
            margin-top: -4px;
            cursor: e-resize;
        }

        .right-down {
            right: -4px;
            bottom: -4px;
            cursor: se-resize;
        }

        .down {
            bottom: -4px;
            right: 50%;
            margin-left: -4px;
            cursor: s-resize;
        }

        .left-down {
            left: -4px;
            bottom: -4px;
            cursor: sw-resize;
        }

        .left {
            left: -4px;
            top: 50%;
            margin-top: -4px;
            cursor: w-resize;
        }
    </style>
</head>

<body>
    <div class="contain">
        <input id="imgFile" type="file" name="imgFile">
        <button id="preview">预览裁剪结果</button>
        <div id="box">
            <img src="" id="img1">
            <img src="" id="img2">
            <div id="main">
                <div class="minDiv left-up"></div>
                <div class="minDiv up"></div>
                <div class="minDiv right-up"></div>
                <div class="minDiv right"></div>
                <div class="minDiv right-down"></div>
                <div class="minDiv down"></div>
                <div class="minDiv left-down"></div>
                <div class="minDiv left"></div>
            </div>
        </div>
    </div>

</body>

<script>
    const doms = {
        imgFile: document.getElementById('imgFile'),
        preview: document.getElementById('preview'),
        box: document.getElementById('box'),
        img1: document.getElementById('img1'),
        img2: document.getElementById('img2'),
        main: document.getElementById('main'),

        leftUp: document.querySelector('.left-up'),
        up: document.querySelector('.up'),
        rightUp: document.querySelector('.right-up'),
        right: document.querySelector('.right'),
        rightDown: document.querySelector('.right-down'),
        down: document.querySelector('.down'),
        leftDown: document.querySelector('.left-down'),
        left: document.querySelector('.left')
    }
    const dirDoms = [
        doms.leftUp,
        doms.up,
        doms.rightUp,
        doms.right,
        doms.rightDown,
        doms.down,
        doms.leftDown,
        doms.left
    ]

    // 封装:更新裁剪框位置和大小(带边界检查)
    function updateCropBoxPosition(left, top, width, height) {
        // console.log('left, top, width, height', left, top, width, height);

        // 边界检查
        const imgWidth = doms.img1.offsetWidth;
        const imgHeight = doms.img1.offsetHeight;

        // 设置最小尺寸限制
        const minWidth = 60;
        const minHeight = 60;

        // 确保宽度和高度不小于最小值
        if (width < minWidth) width = minWidth;
        if (height < minHeight) height = minHeight;

        // 防止左侧溢出
        if (left < 0) {
            left = 0;
        }

        // 防止右侧溢出
        if (left + width > imgWidth) {
            // 尝试调整位置保持宽度
            if (width <= imgWidth) {
                left = imgWidth - width;
            } else {
                // 如果宽度大于图片宽度,限制宽度并居中显示
                width = imgWidth;
                left = 0;
            }
        }

        // 防止顶部溢出
        if (top < 0) {
            top = 0;
        }

        // 防止底部溢出
        if (top + height > imgHeight) {
            // 尝试调整位置保持高度
            if (height <= imgHeight) {
                top = imgHeight - height;
            } else {
                // 如果高度大于图片高度,限制高度并居中显示
                height = imgHeight;
                top = 0;
            }
        }

        // 设置裁剪框样式
        doms.main.style.left = `${left}px`;
        doms.main.style.top = `${top}px`;
        doms.main.style.width = `${width}px`;
        doms.main.style.height = `${height}px`;

        // 更新裁剪路径
        doms.img2.style.clipPath = `polygon(
        ${left}px ${top}px,
        ${left + width}px ${top}px,
        ${left + width}px ${top + height}px,
        ${left}px ${top + height}px
     )`;
    }

    // 实现图片的上传
    doms.imgFile.onchange = function (e) {
        // 获取上传的图片
        const file = e.target.files[0];
        // 创建一个文件读取器
        const reader = new FileReader();
        // 读取文件
        reader.readAsDataURL(file);
        // 读取文件成功时,将图片显示在img1和img2中
        reader.onload = function (e) {
            const imgUrl = e.target.result;
            // 设置图片 src 后,监听图片的 load 事件
            doms.img1.src = imgUrl;
            doms.img2.src = imgUrl;

            // 监听 img1 的 load 事件(确保两张图片共享同一 URL,避免重复加载)
            const img = new Image();
            img.src = imgUrl;
            img.onload = function () {
                // 此时图片已完全渲染,可获取正确尺寸
                const imgWidth = doms.img1.offsetWidth;
                const imgHeight = doms.img1.offsetHeight;

                // 初始化裁剪框
                const width = imgWidth / 2;
                const height = imgHeight / 2;
                const left = imgWidth / 4;
                const top = imgHeight / 4;

                updateCropBoxPosition(left, top, width, height);
                doms.main.style.display = 'block';
            };

            // const url = URL.createObjectURL(file);
            // doms.img1.src = url;
            // doms.img2.src = url;
        };
    };

    // 预览裁剪结果
    doms.preview.onclick = function () {
        // 获取裁剪框的位置和大小
        const left = doms.main.offsetLeft;
        const top = doms.main.offsetTop;
        const width = doms.main.offsetWidth;
        const height = doms.main.offsetHeight;
        // console.log(left, top, width, height);
        // 使用canvas将裁剪框中的图片裁剪出来
        const canvas = document.createElement('canvas');
        canvas.width = width;
        canvas.height = height;
        const ctx = canvas.getContext('2d');
        ctx.drawImage(doms.img1, left, top, width, height, 0, 0, width, height);
        // 将裁剪后的图片显示在页面上 不要被裁剪框遮挡
        canvas.style.position = 'absolute';
        canvas.style.left = doms.img1.offsetWidth + 50 + 'px';
        // 如果canvas已经存在,就删除
        if (document.querySelector('canvas')) {
            document.querySelector('canvas').remove();
        }
        document.body.appendChild(canvas);
        canvas.toBlob(function (blob) {
            // console.log(blob);
            const file = new File([blob], 'cut.png', { type: 'image/png' });
            console.log('file', file);
        })
    }

    // 实现裁剪框的拖拽效果
    doms.main.onmousedown = function (e) {
        // 鼠标按下时,获取鼠标的位置
        const startX = e.clientX;
        const startY = e.clientY;
        // console.log(startX, startY);
        // 裁剪框初始位置
        const startLeft = doms.main.offsetLeft;
        const startTop = doms.main.offsetTop;
        // 鼠标移动时,获取鼠标的位置
        document.onmousemove = function (e) {
            const moveX = e.clientX;
            const moveY = e.clientY;
            // 计算鼠标移动的距离
            const disX = moveX - startX;
            const disY = moveY - startY;
            // console.log(disX, disY);
            // 计算裁剪框的位置
            const left = startLeft + disX;
            const top = startTop + disY;
            updateCropBoxPosition(left, top, doms.main.offsetWidth, doms.main.offsetHeight);
        }
        // 鼠标抬起时,停止移动
        document.onmouseup = function () {
            document.onmousemove = null;
            document.onmouseup = null;
        }

    }
    // 实现裁剪框的缩放效果
    dirDoms.forEach(dirDom => {
        dirDom.onmousedown = function (e) {
            // 阻止父元素的事件
            e.stopPropagation();
            // 鼠标按下时,获取鼠标的位置
            const startX = e.clientX;
            const startY = e.clientY;
            // 裁剪框初始位置
            const startLeft = doms.main.offsetLeft;
            const startTop = doms.main.offsetTop;
            // 裁剪框初始大小
            const startWidth = doms.main.offsetWidth;
            const startHeight = doms.main.offsetHeight;
            // 鼠标移动时,获取鼠标的位置
            document.onmousemove = function (e) {
                const moveX = e.clientX;
                const moveY = e.clientY;
                // 计算鼠标移动的距离
                const disX = moveX - startX;
                const disY = moveY - startY;
                // 根据不同点计算裁剪框的位置和大小
                let left;
                let top;
                let width;
                let height;
                if (dirDom === doms.leftUp) {
                    left = startLeft + disX;
                    top = startTop + disY;
                    width = startWidth - disX;
                    height = startHeight - disY;
                }
                else if (dirDom === doms.up) {
                    left = startLeft;
                    top = startTop + disY;
                    width = startWidth;
                    height = startHeight - disY;
                }
                else if (dirDom === doms.rightUp) {
                    left = startLeft;
                    top = startTop + disY;
                    width = startWidth + disX;
                    height = startHeight - disY;
                }
                else if (dirDom === doms.right) {
                    left = startLeft;
                    top = startTop;
                    width = startWidth + disX;
                    height = startHeight;
                }
                else if (dirDom === doms.rightDown) {
                    left = startLeft;
                    top = startTop;
                    width = startWidth + disX;
                    height = startHeight + disY;
                }
                else if (dirDom === doms.down) {
                    left = startLeft;
                    top = startTop;
                    width = startWidth;
                    height = startHeight + disY;
                }
                else if (dirDom === doms.leftDown) {
                    left = startLeft + disX;
                    top = startTop;
                    width = startWidth - disX;
                    height = startHeight + disY;
                }
                else if (dirDom === doms.left) {
                    left = startLeft + disX;
                    top = startTop;
                    width = startWidth - disX;
                    height = startHeight;
                }
                else {
                    left = startLeft;
                    top = startTop;
                    width = startWidth;
                    height = startHeight;
                }

                updateCropBoxPosition(left, top, width, height);
            }
            // 鼠标抬起时,停止移动
            document.onmouseup = function () {
                document.onmousemove = null;
                document.onmouseup = null;
            }
        }

    })


</script>

</html>
核心功能解析
1.双图片叠加预览技术
我们使用两张相同的图片叠加显示,底层图片 (img1) 设置为半透明作为背景参考,上层图片 (img2) 使用 clip-path 属性进行裁剪,从而实现裁剪效果的实时预览:
#img1 {
    opacity: 0.6;
    position: absolute;
    top: 0;
    left: 0;
}

#img2 {
    opacity: 1;
    position: absolute;
    top: 0;
    left: 0;
    clip-path: polygon(0px 0px, 200px 0px, 200px 200px, 0px 200px);
}
2.图片上传与预览
通过 HTML5 的 File API 实现图片上传功能,使用 FileReader 将图片转换为 DataURL 格式并显示在页面上:
doms.imgFile.onchange = function (e) {
    // 获取上传的图片
    const file = e.target.files[0];
    // 创建一个文件读取器
    const reader = new FileReader();
    // 读取文件
    reader.readAsDataURL(file);
    // 读取文件成功时,将图片显示在img1和img2中
    reader.onload = function (e) {
        const imgUrl = e.target.result;
        // 设置图片 src 后,监听图片的 load 事件
        doms.img1.src = imgUrl;
        doms.img2.src = imgUrl;

        // 监听 img1 的 load 事件(确保两张图片共享同一 URL,避免重复加载)
        const img = new Image();
        img.src = imgUrl;
        img.onload = function () {
            // 此时图片已完全渲染,可获取正确尺寸
            const imgWidth = doms.img1.offsetWidth;
            const imgHeight = doms.img1.offsetHeight;

            // 初始化裁剪框
            const width = imgWidth / 2;
            const height = imgHeight / 2;
            const left = imgWidth / 4;
            const top = imgHeight / 4;

            updateCropBoxPosition(left, top, width, height);
            doms.main.style.display = 'block';
        };

        // const url = URL.createObjectURL(file);
        // doms.img1.src = url;
        // doms.img2.src = url;
    };
};
3.裁剪框的拖拽与缩放交互
核心就是确定裁剪框最终的left,top,width以及height的值,通过监听鼠标事件实现裁剪框的拖拽和缩放功能:
// 实现裁剪框的拖拽效果
doms.main.onmousedown = function (e) {
    // 鼠标按下时,获取鼠标的位置
    const startX = e.clientX;
    const startY = e.clientY;
    // console.log(startX, startY);
    // 裁剪框初始位置
    const startLeft = doms.main.offsetLeft;
    const startTop = doms.main.offsetTop;
    // 鼠标移动时,获取鼠标的位置
    document.onmousemove = function (e) {
        const moveX = e.clientX;
        const moveY = e.clientY;
        // 计算鼠标移动的距离
        const disX = moveX - startX;
        const disY = moveY - startY;
        // console.log(disX, disY);
        // 计算裁剪框的位置
        const left = startLeft + disX;
        const top = startTop + disY;
        updateCropBoxPosition(left, top, doms.main.offsetWidth, doms.main.offsetHeight);
    }
    // 鼠标抬起时,停止移动
    document.onmouseup = function () {
        document.onmousemove = null;
        document.onmouseup = null;
    }
}


// 实现裁剪框的缩放效果
dirDoms.forEach(dirDom => {
    dirDom.onmousedown = function (e) {
        // 阻止父元素的事件
        e.stopPropagation();
        // 鼠标按下时,获取鼠标的位置
        const startX = e.clientX;
        const startY = e.clientY;
        // 裁剪框初始位置
        const startLeft = doms.main.offsetLeft;
        const startTop = doms.main.offsetTop;
        // 裁剪框初始大小
        const startWidth = doms.main.offsetWidth;
        const startHeight = doms.main.offsetHeight;
        // 鼠标移动时,获取鼠标的位置
        document.onmousemove = function (e) {
            const moveX = e.clientX;
            const moveY = e.clientY;
            // 计算鼠标移动的距离
            const disX = moveX - startX;
            const disY = moveY - startY;
            // 根据不同点计算裁剪框的位置和大小
            let left;
            let top;
            let width;
            let height;
            if (dirDom === doms.leftUp) {
                left = startLeft + disX;
                top = startTop + disY;
                width = startWidth - disX;
                height = startHeight - disY;
            }
            else if (dirDom === doms.up) {
                left = startLeft;
                top = startTop + disY;
                width = startWidth;
                height = startHeight - disY;
            }
            else if (dirDom === doms.rightUp) {
                left = startLeft;
                top = startTop + disY;
                width = startWidth + disX;
                height = startHeight - disY;
            }
            else if (dirDom === doms.right) {
                left = startLeft;
                top = startTop;
                width = startWidth + disX;
                height = startHeight;
            }
            else if (dirDom === doms.rightDown) {
                left = startLeft;
                top = startTop;
                width = startWidth + disX;
                height = startHeight + disY;
            }
            else if (dirDom === doms.down) {
                left = startLeft;
                top = startTop;
                width = startWidth;
                height = startHeight + disY;
            }
            else if (dirDom === doms.leftDown) {
                left = startLeft + disX;
                top = startTop;
                width = startWidth - disX;
                height = startHeight + disY;
            }
            else if (dirDom === doms.left) {
                left = startLeft + disX;
                top = startTop;
                width = startWidth - disX;
                height = startHeight;
            }
            else {
                left = startLeft;
                top = startTop;
                width = startWidth;
                height = startHeight;
            }

            updateCropBoxPosition(left, top, width, height);
        }
        // 鼠标抬起时,停止移动
        document.onmouseup = function () {
            document.onmousemove = null;
            document.onmouseup = null;
        }
    }

})
4.边界检查与尺寸限制
为了确保裁剪框不会超出图片范围,我们实现了边界检查功能:
function updateCropBoxPosition(left, top, width, height) {
    // console.log('left, top, width, height', left, top, width, height);

    // 边界检查
    const imgWidth = doms.img1.offsetWidth;
    const imgHeight = doms.img1.offsetHeight;

    // 设置最小尺寸限制
    const minWidth = 60;
    const minHeight = 60;

    // 确保宽度和高度不小于最小值
    if (width < minWidth) width = minWidth;
    if (height < minHeight) height = minHeight;

    // 防止左侧溢出
    if (left < 0) {
        left = 0;
    }

    // 防止右侧溢出
    if (left + width > imgWidth) {
        // 尝试调整位置保持宽度
        if (width <= imgWidth) {
            left = imgWidth - width;
        } else {
            // 如果宽度大于图片宽度,限制宽度并居中显示
            width = imgWidth;
            left = 0;
        }
    }

    // 防止顶部溢出
    if (top < 0) {
        top = 0;
    }

    // 防止底部溢出
    if (top + height > imgHeight) {
        // 尝试调整位置保持高度
        if (height <= imgHeight) {
            top = imgHeight - height;
        } else {
            // 如果高度大于图片高度,限制高度并居中显示
            height = imgHeight;
            top = 0;
        }
    }

    // 设置裁剪框样式
    doms.main.style.left = `${left}px`;
    doms.main.style.top = `${top}px`;
    doms.main.style.width = `${width}px`;
    doms.main.style.height = `${height}px`;

    // 更新裁剪路径
    doms.img2.style.clipPath = `polygon(
    ${left}px ${top}px,
    ${left + width}px ${top}px,
    ${left + width}px ${top + height}px,
    ${left}px ${top + height}px
    )`;
}
5.最终裁剪结果生成
使用 Canvas API 将裁剪区域导出为新的图片(需要注意使用drawImage时如果img区域与原图大小如果不一致的话,需要额外计算缩放比例来确定最终的裁剪区域):
doms.preview.onclick = function () {
    // 获取裁剪框的位置和大小
    const left = doms.main.offsetLeft;
    const top = doms.main.offsetTop;
    const width = doms.main.offsetWidth;
    const height = doms.main.offsetHeight;
    // console.log(left, top, width, height);
    // 使用canvas将裁剪框中的图片裁剪出来
    const canvas = document.createElement('canvas');
    canvas.width = width;
    canvas.height = height;
    const ctx = canvas.getContext('2d');
    ctx.drawImage(doms.img1, left, top, width, height, 0, 0, width, height);
    // 将裁剪后的图片显示在页面上 不要被裁剪框遮挡
    canvas.style.position = 'absolute';
    canvas.style.left = doms.img1.offsetWidth + 50 + 'px';
    // 如果canvas已经存在,就删除
    if (document.querySelector('canvas')) {
        document.querySelector('canvas').remove();
    }
    document.body.appendChild(canvas);
    canvas.toBlob(function (blob) {
        // console.log(blob);
        const file = new File([blob], 'cut.png', { type: 'image/png' });
        console.log('file', file);
    })
}
总结
通过结合 HTML5 的 File API、CSS 的 clip-path 属性和 Canvas API,我们实现了一个功能完整的纯前端图片裁剪工具。这个实现不需要后端支持,所有操作都在浏览器中完成,具有良好的用户体验和性能表现。
可以根据自己的需求进一步扩展这个工具,例如添加预设裁剪比例、旋转功能、滤镜效果等,使其成为一个更强大的图片编辑工具。


